Hey, friends here is an Android SQLite Database Example. You may already know that we have SQLite database in android that we can use as a local SQL Database for our android application.
This Android SQLite Database Example will cover Creating Database, Creating Tables, Creating Records, Reading Records, Updating Records and Deleting Records in Android SQLite Database. After going through this post you will be having a complete idea about using SQLite database for your Android Application. So let’s start.
What is SQLite?
SQLite is an SQL Database. I am assuming here that you are familiar with SQL databases. So in SQL database, we store data in tables. The tables are the structure of storing data consisting of rows and columns. We are not going in depth of what is an SQL database and how to work in SQL database. If you are going through this post, then you must know the Basics of SQL.
What is CRUD?
As the heading tells you here, we are going to learn the CRUD operation in SQLite Database.
But what is CRUD? CRUD is nothing but an abbreviation for the basic operations that we perform in any database. And the operations are
- Create
- Read
- Update
- Delete
Android SQLite Database Example
Creating a new Android Studio Project
- As always we will create a new Android Studio Project. For this example, I have a new project named SQLiteCRUD.
- Once your project is loaded, we can start working on it.
User Interface Design
To implement all the above-given queries in our application, we need an Interface from where we can accomplish these tasks. Now, lets think about the screens that we need to make an app that will perform all the above-given queries with user interaction.
Adding a new Employee
- The first thing is adding a new record to our database, and for this, we can use the following screen.
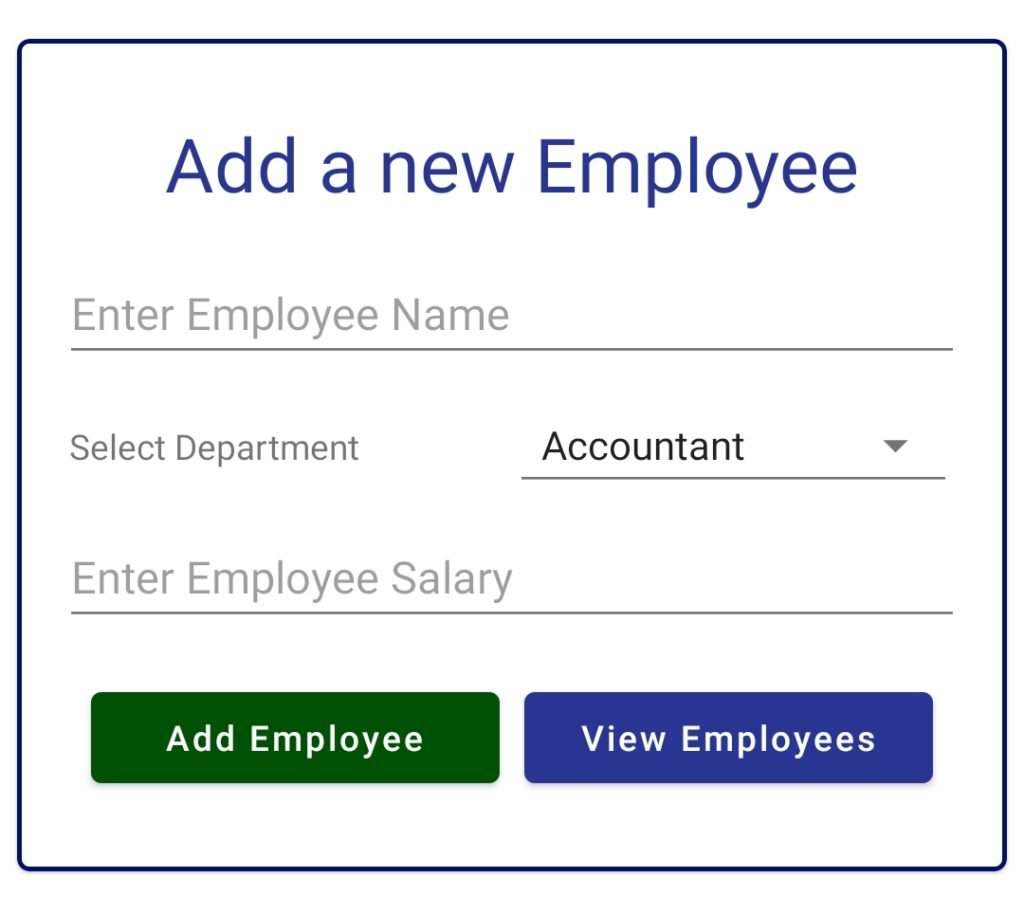
As you can see we have EditText, MaterialButton, Spinner and some TextViews. To create the above interface, you can use the following XML code. You need to paste the following code inside activity_main.xml which is generated by default in any project because this will be the first screen for our application.
activity_main.xml

<?xml version="1.0" encoding="utf-8"?>
<RelativeLayout xmlns:android="http://schemas.android.com/apk/res/android"
    xmlns:app="http://schemas.android.com/apk/res-auto"
    xmlns:tools="http://schemas.android.com/tools"
    android:layout_width="match_parent"
    android:layout_height="match_parent"
    android:gravity="center"
    tools:context=".MainActivity">


    <com.google.android.material.card.MaterialCardView
        android:layout_width="match_parent"
        android:layout_height="wrap_content"
        android:layout_margin="7dp"
        app:cardCornerRadius="5dp"
        app:strokeColor="@color/colorPrimaryDark"
        app:strokeWidth="2dp">

        <LinearLayout
            android:layout_width="match_parent"
            android:layout_height="wrap_content"
            android:layout_margin="15dp"
            android:orientation="vertical">

            <TextView
                android:layout_width="match_parent"
                android:layout_height="wrap_content"
                android:layout_margin="15dp"
                android:text="Add a new Employee"
                android:textAlignment="center"
                android:textColor="@color/colorPrimary"
                android:textSize="30sp" />

            <EditText
                android:id="@+id/editTextName"
                android:layout_width="match_parent"
                android:layout_height="wrap_content"
                android:layout_margin="3dp"
                android:hint="Enter Employee Name"
                android:inputType="textPersonName" />


            <LinearLayout
                android:layout_width="match_parent"
                android:layout_height="wrap_content"
                android:layout_margin="3dp"
                android:orientation="horizontal"
                android:padding="3dp">

                <TextView
                    android:layout_width="0dp"
                    android:layout_height="wrap_content"
                    android:layout_weight="1"
                    android:text="Select Department" />


                <Spinner
                    android:id="@+id/spinnerDepartment"
                    style="@style/Widget.AppCompat.Spinner.Underlined"
                    android:layout_width="0dp"
                    android:layout_height="wrap_content"
                    android:layout_weight="1"
                    android:entries="@array/departments" />
            </LinearLayout>

            <EditText
                android:id="@+id/editTextSalary"
                android:layout_width="match_parent"
                android:layout_height="wrap_content"
                android:layout_margin="3dp"
                android:digits="0123456789"
                android:hint="Enter Employee Salary"
                android:inputType="numberDecimal" />

            <LinearLayout
                android:layout_width="match_parent"
                android:layout_height="wrap_content"
                android:layout_margin="10dp"
                android:orientation="horizontal">

                <com.google.android.material.button.MaterialButton
                    android:id="@+id/btnAddEmployee"
                    android:layout_width="0dp"
                    android:layout_height="wrap_content"
                    android:layout_margin="5dp"
                    android:layout_weight="1"
                    android:text="Add Employee"
                    app:backgroundTint="@color/color_green" />

                <com.google.android.material.button.MaterialButton
                    android:id="@+id/btnViewEmployees"
                    android:layout_width="0dp"
                    android:layout_height="wrap_content"
                    android:layout_margin="5dp"
                    android:layout_weight="1"
                    android:text="View Employees"
                    app:backgroundTint="@color/colorPrimary" />
            </LinearLayout>
        </LinearLayout>
    </com.google.android.material.card.MaterialCardView>
</RelativeLayout>
- For the spinner that we used in the above screen, we need to define an Array as the entries for the spinner. So go inside values->strings.xml and modify it as below.
<resources>
    <string name="app_name">SQLite CRUD</string>

    <array name="departments">
        <item>Accountant</item>
        <item>IT Admin</item>
        <item>Developer</item>
        <item>Marketing</item>
        <item>Human Resource</item>
    </array>
</resources>
Fetching All the Employees
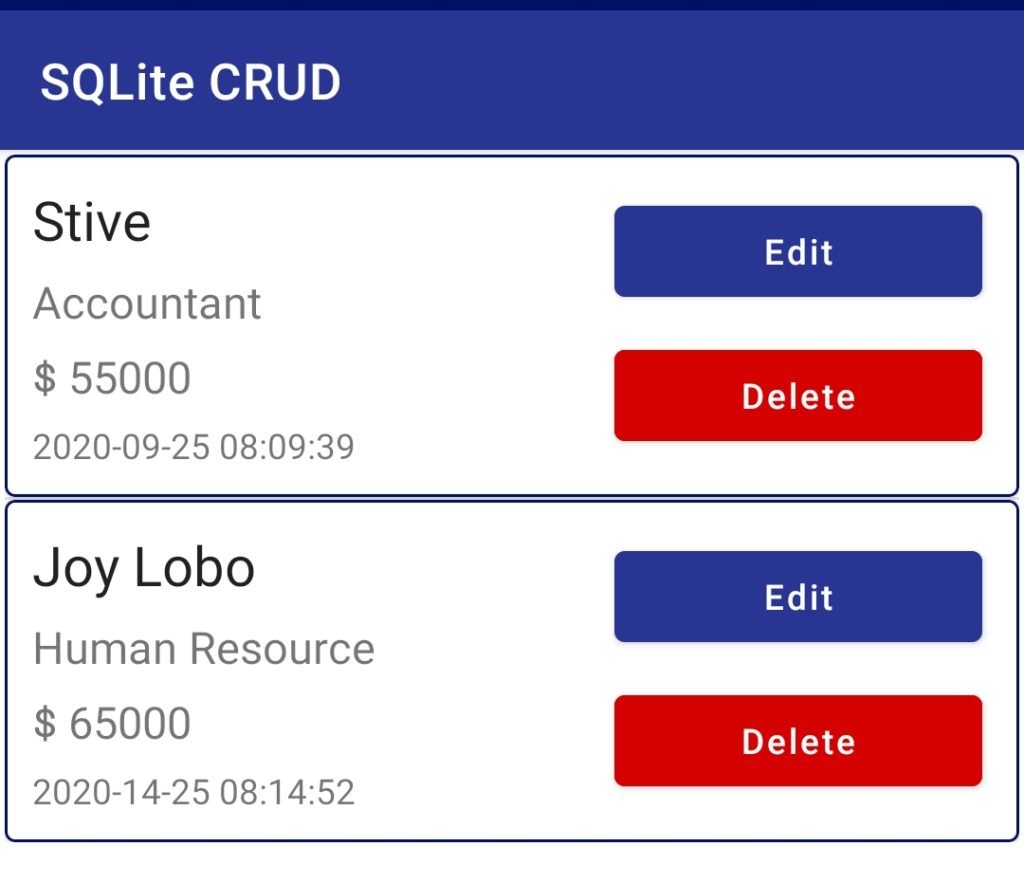
- Now after storing employee to the database, we also need to see all the stored employee from the database. For this, we can use a ListView.
- So, to create a new EmptyActivity in your project named EmployeeActivity. It will create a java file named EmployeeActivity.java and a layout file called activity_employee.xml.
<?xml version="1.0" encoding="utf-8"?>
<RelativeLayout xmlns:android="http://schemas.android.com/apk/res/android"
    xmlns:tools="http://schemas.android.com/tools"
    android:layout_width="match_parent"
    android:layout_height="match_parent"
    tools:context=".EmployeeActivity">


    <ListView
        android:id="@+id/listViewEmployees"
        android:layout_width="match_parent"
        android:layout_height="wrap_content" />

</RelativeLayout>
- But here we will not use a simple ListView as we need to display multiple items in the List we will be using a Custom ListView.
- And for the ListView item we need one more layout as well, so create one more layout file named list_layout_employee.xml and write the following xml code.
<?xml version="1.0" encoding="utf-8"?>
<com.google.android.material.card.MaterialCardView xmlns:android="http://schemas.android.com/apk/res/android"
    xmlns:app="http://schemas.android.com/apk/res-auto"
    android:layout_width="match_parent"
    android:layout_height="wrap_content"
    android:padding="3dp"
    app:strokeColor="@color/colorPrimaryDark"
    app:strokeWidth="1dp">


    <LinearLayout
        android:layout_width="match_parent"
        android:layout_height="match_parent"
        android:orientation="horizontal"
        android:padding="8dp">


        <LinearLayout
            android:layout_width="230dp"
            android:layout_height="wrap_content"
            android:orientation="vertical">

            <TextView
                android:id="@+id/textViewName"
                android:layout_width="match_parent"
                android:layout_height="wrap_content"
                android:layout_margin="3dp"
                android:text="IMRAN ALAM"
                android:textAppearance="@style/Base.TextAppearance.AppCompat.Large" />

            <TextView
                android:id="@+id/textViewDepartment"
                android:layout_width="wrap_content"
                android:layout_height="wrap_content"
                android:layout_margin="3dp"
                android:text="Android Developer"
                android:textAppearance="@style/Base.TextAppearance.AppCompat.Medium" />

            <TextView
                android:id="@+id/textViewSalary"
                android:layout_width="match_parent"
                android:layout_height="wrap_content"
                android:layout_margin="3dp"
                android:text="INR 45000"
                android:textAppearance="@style/Base.TextAppearance.AppCompat.Medium" />

            <TextView
                android:id="@+id/textViewJoiningDate"
                android:layout_width="match_parent"
                android:layout_height="wrap_content"
                android:layout_margin="3dp"
                android:text="2017-09-30 10:00:00" />

        </LinearLayout>

        <LinearLayout
            android:layout_width="match_parent"
            android:layout_height="wrap_content"
            android:layout_margin="2dp"
            android:orientation="vertical">

            <com.google.android.material.button.MaterialButton
                android:id="@+id/buttonEditEmployee"
                android:layout_width="match_parent"
                android:layout_height="wrap_content"
                android:layout_margin="5dp"
                android:text="Edit"
                app:backgroundTint="@color/colorPrimary" />

            <com.google.android.material.button.MaterialButton
                android:id="@+id/buttonDeleteEmployee"
                android:layout_width="match_parent"
                android:layout_height="wrap_content"
                android:layout_margin="5dp"
                android:backgroundTint="@color/color_red"
                android:text="Delete" />

        </LinearLayout>

    </LinearLayout>
</com.google.android.material.card.MaterialCardView>
Updating the Employee
- Now we will create one more layout file (not a new activity only a layout file because we will edit the employee in an alert dialog) to update the employee data. So create a new layout file named dialog_update_employee.xml.
<?xml version="1.0" encoding="utf-8"?>
<LinearLayout xmlns:android="http://schemas.android.com/apk/res/android"
    android:layout_width="match_parent"
    android:layout_height="match_parent"
    android:orientation="vertical"
    android:padding="16dp">

    <TextView
        android:layout_width="match_parent"
        android:layout_height="wrap_content"
        android:layout_marginBottom="12dp"
        android:text="Edit Employee"
        android:textAlignment="center"
        android:textAppearance="@style/Base.TextAppearance.AppCompat.Large" />

    <EditText
        android:id="@+id/editTextName"
        android:layout_width="match_parent"
        android:layout_height="wrap_content"
        android:hint="Enter Employee Name" />

    <TextView
        android:layout_width="match_parent"
        android:layout_height="wrap_content"
        android:layout_marginTop="10dp"
        android:paddingLeft="6dp"
        android:text="Select Department" />

    <Spinner
        android:id="@+id/spinnerDepartment"
        android:layout_width="match_parent"
        android:layout_height="wrap_content"
        android:entries="@array/departments" />

    <EditText
        android:id="@+id/editTextSalary"
        android:layout_width="match_parent"
        android:layout_height="wrap_content"
        android:digits="0123456789"
        android:hint="Enter Employee Salary"
        android:inputType="number" />

    <Button
        android:id="@+id/buttonUpdateEmployee"
        android:layout_width="match_parent"
        android:layout_height="wrap_content"
        android:text="Update" />

</LinearLayout>
- This code will generate the following design

- We don’t need a separate design for deleting the employee as we will be doing it from the button that we created on the List.
- So we are done with the interface design. Now let’s start coding.
Coding the Application
Adding an Employee
- We will perform this operation inside MainActivity.java so inside this file write the following code.
package in.imranalam.app.sqlitecrud;

import android.annotation.SuppressLint;
import android.content.Intent;
import android.database.sqlite.SQLiteDatabase;
import android.os.Bundle;
import android.view.View;
import android.widget.EditText;
import android.widget.Spinner;
import android.widget.Toast;

import androidx.appcompat.app.AppCompatActivity;

import com.google.android.material.button.MaterialButton;

import java.text.SimpleDateFormat;
import java.util.Calendar;

/**
 * Created by IMRAN ALAM on 01/01/2020.
 */

public class MainActivity extends AppCompatActivity implements View.OnClickListener {

    public static final String DATABASE_NAME = "employee_database";
    MaterialButton mAddEmp, mViewEmp;
    EditText mTextName, mTextSalary;
    Spinner mSpinnerDepartment;

    SQLiteDatabase mDatabase;

    @Override
    protected void onCreate(Bundle savedInstanceState) {
        super.onCreate(savedInstanceState);
        setContentView(R.layout.activity_main);

        mViewEmp = findViewById(R.id.btnViewEmployees);
        mAddEmp = findViewById(R.id.btnAddEmployee);
        mTextName = findViewById(R.id.editTextName);
        mTextSalary = findViewById(R.id.editTextSalary);
        mSpinnerDepartment = findViewById(R.id.spinnerDepartment);

        mAddEmp.setOnClickListener(this);
        mViewEmp.setOnClickListener(this);

        //creating a database
        mDatabase = openOrCreateDatabase(DATABASE_NAME, MODE_PRIVATE, null);

    }

    //this method will validate the name and salary
    //dept does not need validation as it is a spinner and it cannot be empty
    private boolean inputsAreCorrect(String name, String salary) {
        if (name.isEmpty()) {
            mTextName.setError("Please enter a name");
            mTextName.requestFocus();
            return false;
        }

        if (salary.isEmpty() || Integer.parseInt(salary) <= 0) {
            mTextSalary.setError("Please enter salary");
            mTextSalary.requestFocus();
            return false;
        }
        return true;
    }

    //In this method we will do the create operation
    private void addEmployee() {

    }

    @Override
    public void onClick(View view) {
        switch (view.getId()) {
            case R.id.btnAddEmployee:
                addEmployee();
                break;
            case R.id.btnViewEmployees:
                startActivity(new Intent(this, EmployeeActivity.class));
                break;
        }
    }
}
- In the above code you see we used a method openOrCreateDatabase().
- This method takes 3 parameters.
First parameter is the database name as String, that we need to open. Let’s assume we passed some name “xyz” as the first parameter then if there exist a database named “xyz” it will open it, if no database found with the specified name it will create a new database named “xyz” and will open it.
Second Parameter is the open mode as int. We have some predefined values for it, right now we are using MODE_PRIVATE and it simply means that only this application can access this database. - Now we will create a method to create the Employee table. So create a method named mCreateEmployeeTable().
    private void mCreateEmployeeTable() {
        mDatabase.execSQL(
                "CREATE TABLE IF NOT EXISTS employees (\n" +
                        "    id INTEGER NOT NULL CONSTRAINT employees_pk PRIMARY KEY AUTOINCREMENT,\n" +
                        "    name varchar(200) NOT NULL,\n" +
                        "    department varchar(200) NOT NULL,\n" +
                        "    joiningdate datetime NOT NULL,\n" +
                        "    salary decimal(5,2) NOT NULL\n" +
                        ");"
        );
    }
- Now just call this method just after calling the openOrCreateDatabase() method. In the above method we are just calling the method execSQL() to create our database table. The execSQL() method takes String as a parameter and the String is actually the SQL query that we need to execute.
- Remember we use execSQL() method only for creating table, inserting or updating records. We cannot use it to retrieve values.
- Till now we have the database, the table now we need to insert the employee in the table and we need to do this inside addEmployee() method.
//In this method we will do the create operation
private void addEmployee() {
String eName = mTextName.getText().toString().trim();
String eSalary = mTextSalary.getText().toString().trim();
String eDept = mSpinnerDepartment.getSelectedItem().toString();
//getting the current time for joining date
Calendar cal = Calendar.getInstance();
@SuppressLint("SimpleDateFormat") SimpleDateFormat sdf = new SimpleDateFormat("yyyy-mm-dd hh:mm:ss");
String eJoiningDate = sdf.format(cal.getTime());
//validating the inputs
if (inputsAreCorrect(eName, eSalary)) {
String insertSQL = "INSERT INTO employees \n" +
"(name, department, joiningdate, salary)\n" +
"VALUES \n" +
"(?, ?, ?, ?);";
//using the same method execsql for inserting values
//this time it has two parameters
//first is the sql string and second is the parameters that is to be bind with the query
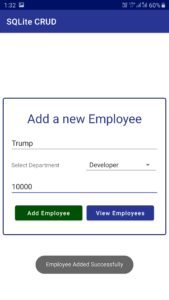
mDatabase.execSQL(insertSQL, new String[]{eName, eDept, eJoiningDate, eSalary});
Toast.makeText(this, "Employee Added Successfully", Toast.LENGTH_SHORT).show();
}
}
- Now you can test your application for the Create Operation.
- Now lets move towards fetching the stored employees which we call the Read Operation.
Retrieving All Employees
- We will do this operation inside EmployeeActivity.java. But before fetching the employees, we need two more java classes to display employees in the list. The first class is a regular java class to store the employee as an object and a CustomAdapter class for the ListView.
Employee Model
- Create a simple java class named Employee.java and write the following code.
package in.imranalam.app.sqlitecrud;

/**
 * Created by IMRAN ALAM on 01/01/2020.
 */

public class Employee {
    int id;
    String name, dept, joiningDate;
    String salary;

    public Employee(int id, String name, String dept, String joiningDate, String salary) {
        this.id = id;
        this.name = name;
        this.dept = dept;
        this.joiningDate = joiningDate;
        this.salary = salary;
    }

    public int getId() {
        return id;
    }

    public String getName() {
        return name;
    }

    public String getDept() {
        return dept;
    }

    public String getJoiningDate() {
        return joiningDate;
    }

    public String  getSalary() {
        return salary;
    }
}
- Now we will create a custom adapter class for our ListView.
Custom ListView Adapter
- Create a java class named EmployeeAdapter.java and write the following code.
package in.imranalam.app.sqlitecrud;

import android.annotation.SuppressLint;
import android.content.Context;
import android.content.DialogInterface;
import android.database.Cursor;
import android.database.sqlite.SQLiteDatabase;
import android.view.LayoutInflater;
import android.view.View;
import android.view.ViewGroup;
import android.widget.ArrayAdapter;
import android.widget.EditText;
import android.widget.Spinner;
import android.widget.TextView;
import android.widget.Toast;

import androidx.annotation.NonNull;
import androidx.annotation.Nullable;
import androidx.appcompat.app.AlertDialog;

import com.google.android.material.button.MaterialButton;

import java.util.List;

/**
 * Created by IMRAN ALAM on 01/01/2020.
 */

public class EmployeeAdapter extends ArrayAdapter<Employee> {

    Context mCtx;
    int listLayoutRes;
    List<Employee> mEmployeeList;
    SQLiteDatabase mDatabase;

    public EmployeeAdapter(Context mCtx, int listLayoutRes, List<Employee> mEmployeeList, SQLiteDatabase mDatabase) {
        super(mCtx, listLayoutRes, mEmployeeList);

        this.mCtx = mCtx;
        this.listLayoutRes = listLayoutRes;
        this.mEmployeeList = mEmployeeList;
        this.mDatabase = mDatabase;
    }

    @NonNull
    @Override
    public View getView(int position, @Nullable View convertView, @NonNull ViewGroup parent) {
        LayoutInflater inflater = LayoutInflater.from(mCtx);
        @SuppressLint("ViewHolder") View view = inflater.inflate(listLayoutRes, null);

        final Employee mEmployee = mEmployeeList.get(position);


        TextView mTextViewName = view.findViewById(R.id.textViewName);
        TextView mTextViewDept = view.findViewById(R.id.textViewDepartment);
        TextView mTextViewSalary = view.findViewById(R.id.textViewSalary);
        TextView mTextViewJoiningDate = view.findViewById(R.id.textViewJoiningDate);

        mTextViewName.setText(mEmployee.getName());
        mTextViewDept.setText(mEmployee.getDept());
        mTextViewSalary.setText(String.format("$ %s", mEmployee.getSalary()));
        mTextViewJoiningDate.setText(mEmployee.getJoiningDate());

        MaterialButton mButtonDelete = view.findViewById(R.id.buttonDeleteEmployee);
        MaterialButton mButtonEdit = view.findViewById(R.id.buttonEditEmployee);
          return view;
    }
}
- Now we can fetch the employees to display them in the ListView.
Retrieving and Displaying in ListView
- Come inside EmployeeActivity.java and write the following code.
package in.imranalam.app.sqlitecrud;

import android.database.Cursor;
import android.database.sqlite.SQLiteDatabase;
import android.os.Bundle;
import android.widget.ListView;

import androidx.appcompat.app.AppCompatActivity;

import java.util.ArrayList;
import java.util.List;

/**
 * Created by IMRAN ALAM on 01/01/2020.
 */

public class EmployeeActivity extends AppCompatActivity {

    List<Employee> mEmployeeList;
    SQLiteDatabase mDatabase;
    ListView eListViewEmployees;
    EmployeeAdapter eAdapter;

    @Override
    protected void onCreate(Bundle savedInstanceState) {
        super.onCreate(savedInstanceState);
        setContentView(R.layout.activity_employee);

        eListViewEmployees = findViewById(R.id.listViewEmployees);
        mEmployeeList = new ArrayList<>();

        //opening the database
        mDatabase = openOrCreateDatabase(MainActivity.DATABASE_NAME, MODE_PRIVATE, null);
        //this method will display the employees in the list
        mShowEmployeesFromDatabase();
    }

    private void mShowEmployeesFromDatabase() {

        Cursor mCursorEmployees = mDatabase.rawQuery("SELECT * FROM employees", null);

        //if the cursor has some data
        if (mCursorEmployees.moveToFirst()) {
            //looping through all the records
            do {
                //pushing each record in the employee list
                mEmployeeList.add(new Employee(
                        mCursorEmployees.getInt(0),
                        mCursorEmployees.getString(1),
                        mCursorEmployees.getString(2),
                        mCursorEmployees.getString(3),
                        mCursorEmployees.getString(4)
                ));
            } while (mCursorEmployees.moveToNext());
        }
        //closing the cursor
        mCursorEmployees.close();
        //creating the adapter object
        eAdapter = new EmployeeAdapter(this, R.layout.list_layout_employee, mEmployeeList, mDatabase);
        //adding the adapter to listView
        eListViewEmployees.setAdapter(eAdapter);
    }

}
Updating an Employee
- We have done with Create and Read, now let’s do the Update Operation. We will perform it inside the EmployeeAdapter class.
- For the Update operation we need two new methods inside the EmployeeAdapter.java. One is to update the employee and the second one is to reload the employee from database to show updated information.
- So inside the class you need to make below given two methods named mUpdateEmployee() and mReloadEmployeesFromDatabase() method.
  private void mUpdateEmployee(final Employee employee) {
        final AlertDialog.Builder builder = new AlertDialog.Builder(mCtx);

        LayoutInflater inflater = LayoutInflater.from(mCtx);
        @SuppressLint("InflateParams") View view = inflater.inflate(R.layout.dialog_update_employee, null);
        builder.setView(view);


        final EditText mEditTextName = view.findViewById(R.id.editTextName);
        final EditText mEditTextSalary = view.findViewById(R.id.editTextSalary);
        final Spinner mSpinnerDepartment = view.findViewById(R.id.spinnerDepartment);

        mEditTextName.setText(employee.getName());
        mEditTextSalary.setText(String.valueOf(employee.getSalary()));

        final AlertDialog dialog = builder.create();
        dialog.show();

        view.findViewById(R.id.buttonUpdateEmployee).setOnClickListener(new View.OnClickListener() {
            @Override
            public void onClick(View view) {
                String name = mEditTextName.getText().toString().trim();
                String salary = mEditTextSalary.getText().toString().trim();
                String dept = mSpinnerDepartment.getSelectedItem().toString();

                if (name.isEmpty()) {
                    mEditTextName.setError("Name can't be blank");
                    mEditTextName.requestFocus();
                    return;
                }

                if (salary.isEmpty()) {
                    mEditTextSalary.setError("Salary can't be blank");
                    mEditTextSalary.requestFocus();
                    return;
                }

                String sql = "UPDATE employees \n" +
                        "SET name = ?, \n" +
                        "department = ?, \n" +
                        "salary = ? \n" +
                        "WHERE id = ?;\n";

                mDatabase.execSQL(sql, new String[]{name, dept, salary, String.valueOf(employee.getId())});
                Toast.makeText(mCtx, "Employee Updated", Toast.LENGTH_SHORT).show();
                mReloadEmployeesFromDatabase();

                dialog.dismiss();
            }
        });
    }

    private void mReloadEmployeesFromDatabase() {
        Cursor cursorEmployees = mDatabase.rawQuery("SELECT * FROM employees", null);
        if (cursorEmployees.moveToFirst()) {
            mEmployeeList.clear();
            do {
                mEmployeeList.add(new Employee(
                        cursorEmployees.getInt(0),
                        cursorEmployees.getString(1),
                        cursorEmployees.getString(2),
                        cursorEmployees.getString(3),
                        cursorEmployees.getString(4)
                ));
            } while (cursorEmployees.moveToNext());
        }
        cursorEmployees.close();
        notifyDataSetChanged();
    }
}
- The update operation is same as the insert operation, we changed the query only to update from insert. If you are having any confusion understanding the codes please comment and I will help you.
- Now we need to modify the getView() method of EmployeeAdapter as below.
public View getView(int position, @Nullable View convertView, @NonNull ViewGroup parent) {
        LayoutInflater inflater = LayoutInflater.from(mCtx);
        @SuppressLint("ViewHolder") View view = inflater.inflate(listLayoutRes, null);

        final Employee mEmployee = mEmployeeList.get(position);


        TextView mTextViewName = view.findViewById(R.id.textViewName);
        TextView mTextViewDept = view.findViewById(R.id.textViewDepartment);
        TextView mTextViewSalary = view.findViewById(R.id.textViewSalary);
        TextView mTextViewJoiningDate = view.findViewById(R.id.textViewJoiningDate);

        mTextViewName.setText(mEmployee.getName());
        mTextViewDept.setText(mEmployee.getDept());
        mTextViewSalary.setText(String.format("$ %s", mEmployee.getSalary()));
        mTextViewJoiningDate.setText(mEmployee.getJoiningDate());

        MaterialButton mButtonDelete = view.findViewById(R.id.buttonDeleteEmployee);
        MaterialButton mButtonEdit = view.findViewById(R.id.buttonEditEmployee);

        //adding a click listener to button
        mButtonEdit.setOnClickListener(new View.OnClickListener() {
            @Override
            public void onClick(View view) {
                mUpdateEmployee(mEmployee);
            }
        });
 return view;
    }
- Now you can test the Update Operation.
Deleting an Employee
- We have done with Create, Read and Update. Now the last operation is the Delete Operation. So let’s do this to complete the CRUD for this tutorial.
- We will do the deletion also in the EmployeeAdapter class. The operation is same we just need to change the SQL String to perform delete operation the rest part is exactly the same.
- So to make the delete operation again modify the getView() of EmployeeAdapter as below.
   @NonNull
    @Override
    public View getView(int position, @Nullable View convertView, @NonNull ViewGroup parent) {
        LayoutInflater inflater = LayoutInflater.from(mCtx);
        @SuppressLint("ViewHolder") View view = inflater.inflate(listLayoutRes, null);

        final Employee mEmployee = mEmployeeList.get(position);


        TextView mTextViewName = view.findViewById(R.id.textViewName);
        TextView mTextViewDept = view.findViewById(R.id.textViewDepartment);
        TextView mTextViewSalary = view.findViewById(R.id.textViewSalary);
        TextView mTextViewJoiningDate = view.findViewById(R.id.textViewJoiningDate);

        mTextViewName.setText(mEmployee.getName());
        mTextViewDept.setText(mEmployee.getDept());
        mTextViewSalary.setText(String.format("$ %s", mEmployee.getSalary()));
        mTextViewJoiningDate.setText(mEmployee.getJoiningDate());

        MaterialButton mButtonDelete = view.findViewById(R.id.buttonDeleteEmployee);
        MaterialButton mButtonEdit = view.findViewById(R.id.buttonEditEmployee);

        //adding a click listener to button
        mButtonEdit.setOnClickListener(new View.OnClickListener() {
            @Override
            public void onClick(View view) {
                mUpdateEmployee(mEmployee);
            }
        });

        //the delete operation
        mButtonDelete.setOnClickListener(new View.OnClickListener() {
            @Override
            public void onClick(View view) {
                AlertDialog.Builder builder = new AlertDialog.Builder(mCtx);
                builder.setTitle("Are you sure?");
                builder.setPositiveButton("Yes", new DialogInterface.OnClickListener() {
                    @Override
                    public void onClick(DialogInterface dialogInterface, int i) {
                        String sql = "DELETE FROM employees WHERE id = ?";
                        mDatabase.execSQL(sql, new Integer[]{mEmployee.getId()});
                        mReloadEmployeesFromDatabase();
                    }
                });
                builder.setNegativeButton("Cancel", new DialogInterface.OnClickListener() {
                    @Override
                    public void onClick(DialogInterface dialogInterface, int i) {

                    }
                });
                AlertDialog dialog = builder.create();
                dialog.show();
            }
        });

        return view;
    }
- So, the operation is complete and now you can test all the operation in your application and you should see something like this.
Android SQLite Database Example Source Code
- If you are facing any troubles building, the application then doesn’t worry here is my source code for you.